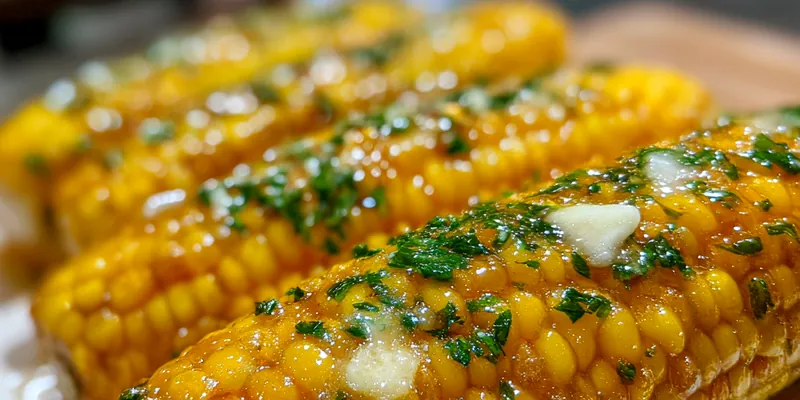
Corn on the Cob with Butter
Corn on the Cob with Butter is a timeless summer dish that brings together the sweetness of fresh corn and the rich taste of butter. This simple yet delicious recipe is perfect for barbecues, picnics, or family dinners. The combination of buttery goodness and a touch of seasoning elevates the corn to a mouthwatering treat that everyone will love. It’s not just a side dish; it’s a delightful experience that celebrates the flavors of summer. Enjoy this dish fresh off the grill or boiled, paired with your favorite meals for a delightful addition.

Why This Corn on the Cob with Butter Works
The technique behind cooking corn on the cob is essential to achieving the best flavor and texture. Boiling or grilling the corn brings out its natural sweetness and keeps it juicy. By adding butter and seasonings, you enhance the corn's flavor profile, making each bite a delightful experience. The blend of creamy butter with fresh herbs and spices adds complexity, ensuring this dish stands out on any table. In this recipe, we focus on essential techniques that elevate this simple dish into something extraordinary.
What makes this Corn on the Cob with Butter special is its versatility and appeal to all ages. It's a nostalgic dish that brings back memories of summer cookouts and family gatherings. The combination of sweet corn and rich butter can be customized with different spices and herbs, allowing you to make it your own. Whether you’re enjoying it at a backyard barbecue or a cozy family dinner, this dish is guaranteed to bring smiles. The delightful aroma and vibrant colors of the corn make it a standout addition to any meal.
💡 Professional Tip
For the best flavor, use fresh, in-season corn as it's naturally sweeter and more tender. Always taste the corn before adding too much seasoning; sometimes, the corn's natural sweetness is all you need. If you’re grilling, ensure your grill is preheated to medium-high to achieve those beautiful char marks. Also, consider using flavored butters, such as garlic or herb-infused, for an extra layer of taste. Lastly, pair your corn with complementary sides like grilled meats or fresh salads for a balanced meal.
Frequently Asked Questions
Yes, you can prepare the corn ahead of time, but it’s best to cook it just before serving for optimal flavor and texture. If you need to make it in advance, you can cook the corn, and then store it in an airtight container in the refrigerator. When you’re ready to serve, reheat the corn in a microwave or on the grill for a few minutes. Keep in mind that freshly cooked corn will always taste better, so try to serve it as soon as you can.
If you're looking for substitutions, consider using olive oil or vegan butter for a dairy-free option. You can also explore flavored butters, such as chili lime or garlic herb, to add a different twist. For those with dietary restrictions, using herbs and spices can enhance the flavor without butter. Additionally, try adding cheese like feta or cotija for a savory touch if you prefer a more gourmet approach.
You can tell the corn is done when the kernels are bright yellow and tender to the bite. If you're boiling, it usually takes about 10-15 minutes; for grilling, around 20-30 minutes until the corn is easily pierced with a fork. Another indicator is the aroma; when the sweet smell of corn fills the air, it's likely ready. Always taste a kernel for the best confirmation—it should be sweet and juicy.
Yes, you can freeze corn on the cob, but it’s best to blanch it first to preserve its flavor and texture. Blanch the corn for about 4-5 minutes, then immediately transfer it to an ice bath to stop the cooking process. Once cooled, dry the corn, wrap it tightly in plastic wrap or aluminum foil, and place it in a freezer bag. It can be stored in the freezer for up to 6 months. When you're ready to enjoy it, simply thaw and reheat.
Corn on the Cob with Butter pairs wonderfully with grilled meats like burgers, steaks, or chicken. It also complements salads, baked beans, or coleslaw, making it an excellent addition to any summer feast. You can serve it alongside potato dishes, such as potato salad or mashed potatoes, to create a hearty meal. For a light touch, try pairing it with fresh fruit salads or a simple green salad for a refreshing contrast.
Cooked corn on the cob can be stored in the refrigerator for up to 3-5 days. To keep it fresh, place it in an airtight container or wrap it tightly in plastic wrap. If you notice any signs of spoilage, such as off smells or discoloration, it's best to discard it. For longer storage, consider freezing the corn as previously mentioned, which can extend its shelf life significantly.
You can easily adjust the spice level by adding more or less of the seasoning in the butter mixture. For a milder flavor, reduce the amount of black pepper and garlic powder. If you prefer it spicier, consider adding cayenne pepper or chili flakes to the butter blend. Always taste as you go, so you can achieve the perfect balance that suits your palate.
The best way to reheat corn on the cob is by either steaming or microwaving it to retain moisture. If microwaving, wrap the corn in a damp paper towel and heat for 30-60 seconds. If using a steamer, place the corn over boiling water for a few minutes until heated through. Avoid reheating in a dry pan, as it can make the corn tough and dry.
Recipe Troubleshooting Guide
Too Dry
Problem: Corn that turns out dry is often a result of overcooking or not enough butter.
Solution: To fix dry corn, you can brush it with melted butter or a drizzle of olive oil to add moisture back. Additionally, consider cooking it for a shorter time next time to prevent this issue. Always taste the corn as it cooks to gauge its doneness.
Not Crispy
Problem: Corn on the cob that isn't crispy may be due to cooking it at too low a temperature or for too little time.
Solution: Ensure your grill or pot is properly preheated before cooking. For added crispiness, try grilling the corn without foil for the last few minutes to achieve a nice char. Turning the corn frequently can also help it cook evenly.
Overcooked
Problem: Overcooked corn can become mushy and lose its sweet flavor.
Prevention: If you’ve overcooked the corn, consider using it in soups or salads where the texture is less noticeable. For future cooking, set a timer and check the corn a few minutes before the recommended cooking time to prevent this from happening.
Undercooked
Problem: Undercooked corn will be tough and chewy, lacking the sweet flavor we desire.
Recovery: If you find the corn is undercooked, simply return it to the pot or grill and cook for a few more minutes. Always check the doneness by tasting a kernel before serving to ensure it's tender.
Burnt
Problem: Burnt corn can happen if it's left on the grill or in boiling water for too long.
Prevention: To avoid burnt corn, monitor it closely while cooking and adjust the heat if necessary. If you do end up with burnt spots, try cutting them off and enjoy the remaining corn. Using foil can also help protect the corn from direct flames.
Flavor Balance
Too Sweet: If the corn is too sweet, consider balancing it with a touch of salt or acidity.
Too Salty: For overly salty corn, try serving it with fresh lime or lemon to cut through the saltiness.
Bland: If your corn lacks flavor, add more seasoning or try a flavored butter to enhance the taste.
Key Ingredients
The main ingredient in this recipe is, of course, fresh corn on the cob. Look for ears that are bright green and tightly packed with kernels. The quality of the corn greatly affects the final taste, so choose in-season corn for the sweetest flavor. You'll need unsalted butter, which is essential for adding creaminess and richness. Using softened butter allows for easy spreading and ensures it melts into the warm corn.
Seasonings play a crucial role in elevating the dish. Salt enhances the natural sweetness of the corn, while black pepper adds a subtle kick. Sugar is optional but can enhance the corn's sweetness when using less ripe varieties. Fresh parsley brings a pop of color and fresh flavor, while garlic powder and paprika add depth and complexity. Together, these ingredients create a balanced flavor profile that complements the corn beautifully.
Essential Ingredient Notes
- Main Ingredient: Fresh corn on the cob is the star of this dish. Choose ears that feel firm and heavy with tightly packed kernels. The husks should be bright green and moist, indicating freshness. When in season, corn on the cob is naturally sweet and requires minimal seasoning to shine.
- Second Key Ingredient: Unsalted butter is preferred for this recipe as it allows you to control the saltiness. Use high-quality butter for the best flavor and texture. Softening the butter before application ensures it spreads easily and melts into the warm corn. For a twist, consider using herb-infused butter for added flavor.
- Essential Seasoning: Salt is a key seasoning that enhances the corn's natural sweetness. Black pepper adds a nice contrast, while sugar can be used to amplify sweetness in less ripe corn. Fresh herbs like parsley not only add flavor but also elevate the visual appeal of the dish. Experimenting with different seasoning combinations can lead to exciting new flavors.
Cooking Process
The cooking process for Corn on the Cob with Butter is straightforward but requires attention to detail. Start by boiling or grilling the corn until it's tender, ensuring not to overcook it. The timing varies based on the method used; boiling takes around 10-15 minutes while grilling may take 20-30 minutes. It's crucial to monitor the corn closely to avoid undercooking or burning.
Once cooked, the real magic happens when you apply the butter mixture. Generously spreading the seasoned butter over the warm corn allows it to melt and infuse the kernels with flavor. Serve immediately for the best taste, and consider garnishing with extra herbs or cheese for an added touch of elegance. Enjoy the delightful combination of flavors and textures with every bite!
Key Technique
The key technique for achieving perfect corn on the cob lies in cooking it just right. Whether you choose to boil or grill, maintaining the right temperature is crucial to avoid overcooking or undercooking. Using aluminum foil while grilling helps retain moisture and flavor. Spreading softened butter immediately after cooking ensures that it melts perfectly into the corn, enhancing the overall taste. Finally, don't forget to season well for a flavorful experience.
Corn on the Cob with Butter
📋 Ingredients
Main Ingredients
- 1 cup unsalted buttersoftened for easy application
- 1 teaspoon saltto enhance sweetness
- 1 teaspoon black pepperfor a subtle kick
- 1 tablespoon sugaroptional to amplify sweetness
- 1 tablespoon fresh parsleychopped for freshness
Sauce/Seasoning
- 4 ears of fresh cornhusked and cleaned
- 1 lemoncut into wedges for serving
- Parmesan cheeseoptional for topping
Instructions
Prepare the Corn
Start by removing the husks and silk from the ears of corn. Rinse them under cold water to clean off any remaining silk. If grilling, wrap each ear in aluminum foil for even cooking.
Boil or Grill the Corn
For boiling, bring a large pot of water to a boil. Add the corn and cook for about 10-15 minutes until tender. If grilling, place the wrapped corn on the grill, turning occasionally for about 20-30 minutes.
Prepare the Butter Mixture
In a bowl, combine the softened butter, salt, black pepper, sugar, parsley, garlic powder, and paprika. Mix well until all the ingredients are fully incorporated.
Coat the Corn
Once the corn is cooked, carefully unwrap it from the foil or remove it from the pot. Spread the butter mixture generously over each ear of corn, ensuring it's well-coated.
Serve
Serve the corn on the cob with lemon wedges on the side for an added burst of flavor. Optionally, sprinkle with grated Parmesan cheese for a gourmet touch.
Recipe Notes & Tips
Storage Tips
Store leftover corn on the cob in an airtight container in the refrigerator for up to 3-5 days. To keep the corn moist, wrap it in plastic wrap or aluminum foil before refrigerating. If you plan to enjoy it later, consider freezing the corn after cooking and cooling. Properly stored, frozen corn can last for up to 6 months.
Serving Ideas
Corn on the Cob with Butter is best served warm, immediately after cooking. Pair it with grilled meats, fresh salads, or hearty sides for a complete meal. For a fun twist, try serving it with flavored butters or spices to cater to different tastes. You can also include it in summer barbecue platters alongside other favorites.
Variations
Feel free to experiment with different butters for a unique twist on the classic recipe. Try adding herbs like basil or dill, or spices such as chili powder for extra heat. You can also explore different cheeses, such as feta or Cotija, for a Mediterranean flair. For a sweet touch, drizzle some honey over the buttered corn before serving.